Here is my second submission for Altenew Educator Certification Program Level 2. This card is based on lesson six of the class In the mood for Colour. The class was conducted by Stephanie Klauck. With the Autumn Season setting here in New Zealand, I wanted to make a card using the shades of Browns and Oranges.
I have used the Altenew stamp set A study of
watercolour (April Release).
I took a Neenah Solar White #110 cardstock
measuring 4” x 5 ¼”, and stamped the image using the Altenew inks Paper Bag, Autumn
Blaze, Orange Cream and Sunkissed to create an Ombre effect.
I did use a heat tool to dry the inks before
moving to the next step as I wanted to heat emboss the sentiment.
I used the sentiment from Altenew For All Seasons
stamp set, and heat embossed the same using Ranger Super fine Gold embossing
powder.
I also applied Versamark ink all around the card
panel randomly and heat embossed that too, to create some extra textures on the
panel.
Finally, I added Nuvo drops to add further interest
to the background
To complete the card, I adhered the ready card
panel to an A2 size card base using some foam tape.
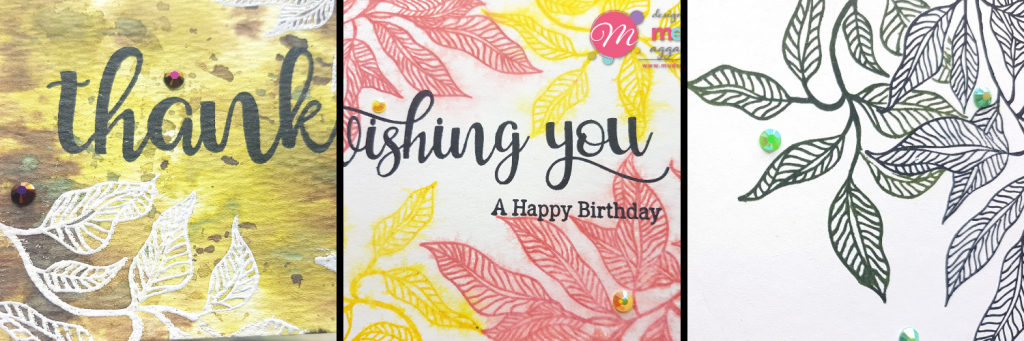
Today, I am sharing three cards I made using Mudra Craft Stamp’s Leaves stamp set. This is one of the most versatile stamp set and these must be the fastest three cards I have made so far in my crafty journey. It must have taken me approximately 30 minutes to make all three.
Here is the sneak peek:
Click HERE to visit Mudra Craft Stamps blog for all the details.
Today, I am sharing three cards I made using Mudra Craft Stamp’s Wild Rose stamp set. I have coloured the images using three different mediums Copic Markers, Mijello Mission Gold Watercolors and Faber-Castell – Polychromos Colour Pencils. Click HERE to visit Mudra Craft Stamps blog for all the details.
Today I am sharing three cards I made using the MFT stamp Party Like a Pirate. I have coloured all the images using Copic markers.
Firstly, I stamped 3 sets of all the images from the stamp set on Copic X-Press Blending Card with Amalgam Ink. Then, I coloured all the images using copic markers from my stash.
Once all the elements were ready, I assembled and card as seen in the picture and also stamped the sentiment from the same stamp set and Versafine Nocturne Ink.
Today, I start a new chapter in my craft journey. I am
joining the talented Design Team of Mudra Craft Stamps. It’s an Indian company
and it feels like going back to my roots.
For my first post, I have made three cards using one Mudra stamp
Magnolia. Here is a sneak peek of my cards
I am super impressed with the quality of the clear stamps
from Mudra and also with the other products I received in my DT package. Here
is a glimpse of all the craft goodies and would like to thank Varshitha for the
same.
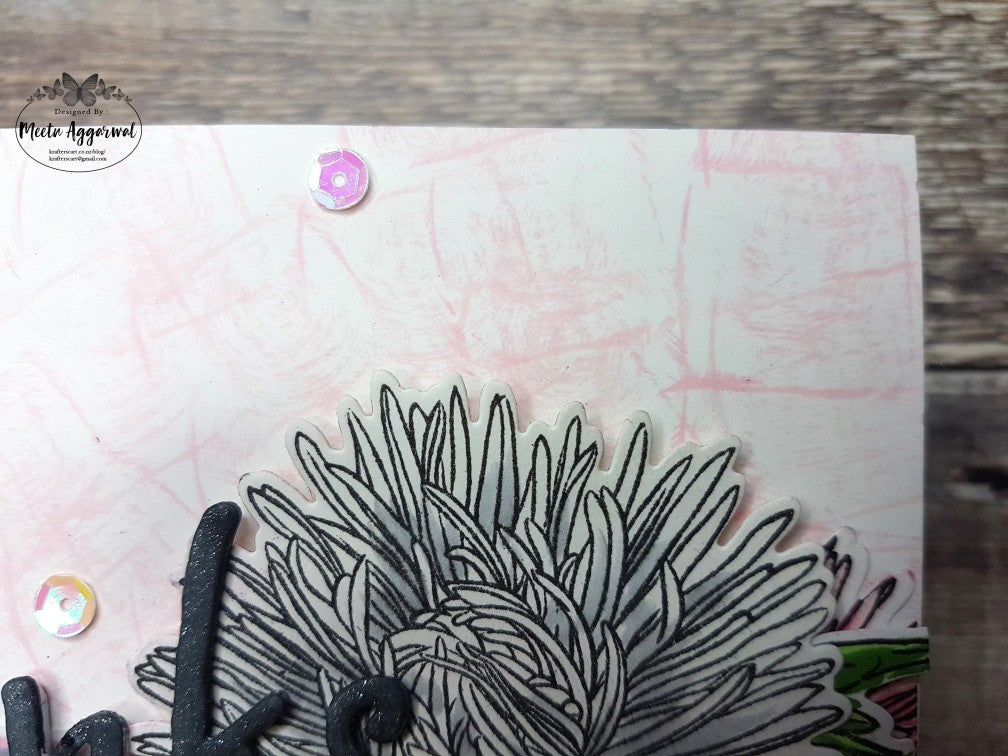
Here is my first submission for Altenew Educator Certification Program Level 2. This card is based on techniques learnt in the class Beautiful Details. The class was conducted by Marika Rahtu.
For this card I have used the stamp Build-A-Flower: Larkspur,
the sentiment is from the stamp set Altenew – Wonderland Stamp Set.
First, I stamped the outline image using the Versafine Clair
Nocturne ink on a Fabriano cardstock meant for coloured pencil. I then applied
the base colour on the image using the Wisteria ink pad.
Next, using Faber-Castell – Polychromos Colour Pencils, I
then added the details on the flowers and leaves.
Once I was satisfied with the shadows on the flowers and
leaves, I used a white gel pen to add more details to the flower centre. Then, I did fussy cut all the images.
I took an A2 size cardstock and applied Mustard Seed oxide
ink using Picket fence Life changing brushes.
Next, I did splatter black paint and some water to create texture on the
card base.
After drying the card base, I arranged the flower arrangement
as desired and used glue and foam tape to adhere the same.
Once the card was ready, I stamped the sentiment using my
stamping tool to finish off the card.
Thank you for your visit today and Happy Crafting.
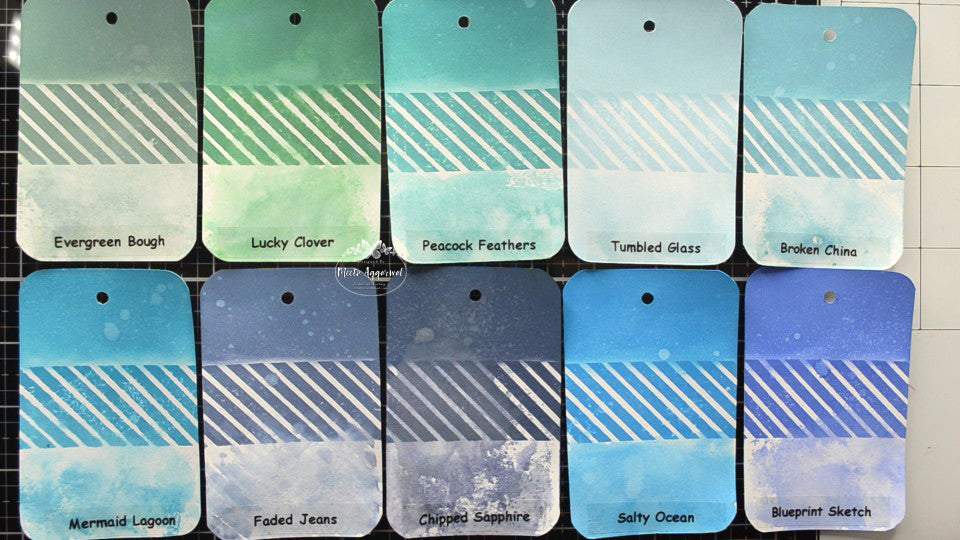
Hello Friends, Thank you for your visit to my blog. A few days back I had shared a picture of my Distress Oxide Ink swatches on Facebook. A few of my friends wanted to know exactly how I had done the same, so I have shot a small tutorial and also have uploaded pics here, which you may use to compare all the 60 colours.
Here is the video tutorial.
I took sheets of Neenah Solar white 80-pound cardstock and divided each sheet into 8 equal parts. Each swatch measured 2 and 3 quarter of an inch by 4 and a quarter inch.
I then used a corner rounder punch to round all the corners and
also used a crop-a-dile to punch a hole at the top centre of each swatch.
For my swatches I have used Your Next stamps Thick Stripe-Tastic Diagonal Edge stamp set. I did finish one swatch at a time.
First, I stamped the swatch in the middle, using the stamp
and the distress oxide ink I wanted to swatch.
Next, I took the same ink and with the help of a blending
tool, I applied the ink to the top portion of the swatch.
Finally, to the remaining ink on the mat (you may dab the
ink pad onto the mat if nothing is there), I spritz some water and picked the
ink on the bottom portion of the swatch.
To finish the swatch, I did spray water once on the top portion
of the swatch using my Distress Sprayer.
After drying the swatch with the heat tool, I used my
Brother Label Printer and labelled all the swatches.
A ring binder holds all my swatches together and is really very handy. Here are the pics of the Distress Inks swatched, you may use this for choosing the colors too.
Here are some details about these inks from Ranger Ink website:
Tim Holtz Distress® Oxide® Ink Pads are water-reactive dye & pigment ink fusion that creates an oxidized effect when sprayed with water. Use with stamps, stencils, and direct to surface. Blend using Ink Blending Tools and Foam. Re-inkers can be used to re-ink Tim Holtz Distress® Oxides® Ink Pads, which are sold separately. Re-inkers are available in .5 oz bottles.
TIM HOLTZ DISTRESS® OXIDES®
Water-reactive dye and pigment ink
Available in 60 colors
Coordinates with the Distress palette
3” x 3” Ink Pads
Hope this post is helpful to you. Thank you for taking out time to read through and Happy Crafting…
The card I am sharing today incorporates three techniques Emboss resist, creating texture with Embossing Paste/stencil and Painting with Inkpads. This is Part 2 of the final challenge given to me at the Altenew Academy. Hope you like the card. I do have a video tutorial.
Here is the video tutorial…
I have used the beautiful floral
set Cherished Memories by Altenew. As I plan to colour the blooms with water
based Altenew inks, I have taken a piece of Canson watercolor paper.
As the stamp is brand new, I did
prep it first by rubbing the same with an eraser.
For heat embossing I first prep
the paper with an anti-static powder as I did not want the embossing powder to
stick everywhere. Next, using Versamark ink and Judikins Iridescent sparkle powder
I heat emboss all the blooms in the set.
Now for my favourite part,
water-colouring. I built on the colour of
the blooms and leaves in layers. I coloured the base very light and slowly moved
to a darker shade with each layer. I realised that the inks moved better when I
was using a water brush instead of normal brush. I coloured one petal at a
time. Using a water brush I was
spreading water first then just dropping colour wherever I wanted to show
shadows on a petal. Also, as I had heat embossed the blooms and leaves, it was
easy to colour them.
Once I was satisfied with the
colouring, I used a pair of scissors to fussy cut all the elements.
For the card base I again took
Canson water colour paper. To create texture onto the background, I took some
embossing paste and mixed some Glitter to it. I then applied this paste to the
background using classy stripes stencil and a spatula.
Once the paste had dried, I picked
some coral berry ink with my watercolor brush, and gently squeezed the barrel.
This diluted the ink and it spread out beautifully onto the paper.
I did apply the ink in same
manner 2-3 times. Once satisfied, I used the heat gun to dry the base.
Once done I arranged the flowers
as desired. Using press n seal, I then picked the arrangement and applied
adhesive and foam squares to this arrangement. Once done, I pressed the
arrangement onto the ready panel. I did check the pieces and used more glue as
required.
Next, I took the darkest ink and
applied the same to the shadow areas. This really made each level distinctive.
Now for the sentiment, I again
choose Altenew Label love stamp set. After stamping and cutting the strip, I
did go over the edges with the Coral Berry ink.
Whenever I am making a card, I do
try and follow the rule of thirds. So here too, I used the same to decide the
placement of the sentiment. Once done, I used some glue and foam strip to
adhere the sentiment to the card.
For the card base, I took an A2
size top folding card, I glued down the ready panel onto the same. For the
final touch, I applied Nuvo drops Morning Dew.
Hope you liked the card. Thank you for reading and happy crafting.
Today, I am going to share a masculine birthday card. This is a part of the final challenge given to me for completing Level 1 of the Altenew Educator Certification Program. I do have a video tutorial too.
I was asked to create a masculine card using any three techniques learnt in the Level 1 classes held at the Altenew Academy. Here is the video tutorial:
I used the three basic techniques, Ink Blending, Layer Stamping and heat embossing to add shimmer and shine to my card.
For my card I have used Altenew’s Arabesque Medallion Stamp set. I really found this motif stamp very elegant and pretty.
Firstly, I
took a 5”X 7” Neenah Solar White 80 pounds cardstock. I mounted the motif to my
MISTI door and used the Versafine Onyx Black Ink, to stamp the image. As the
stamp was already mounted, I also took a sheet of Inkadinkado masking paper and
stamped the motif on that too.
Next, I
selected the parts of the motif which I wanted to heat emboss. There are many small
stamps in this set which can be used to add colour and these fit perfectly onto
the big motif.
Using
Versamark Ink and some Superfine Gold embossing powder, I then heat emboss the
desired parts. For every portion I was heat embossing I was using the
Anti-Static powder before-hand, to avoid getting the embossing powder
everywhere.
Next, I took
the masking paper on which I had stamped the motif. Using a pair of scissors
first I fussy cut the outside border line and remove all the extra paper. Next,
using a pencil I marked the parts through which I wanted the background colour
to show. Now these were the parts I had to fussy cut. For this I used a paper
knife. Here is a small tip, the parts which I wanted to remove, I cut slits
into them. Then I could cut these using my pointy scissors easily.
As this
motif is a repetitive pattern, I did not bother to cut it fully and decided to
just flip the mask once half way through with the ink blending. I will make
sense in few seconds so please bear with me.
Once the
fussy cut was done, I adhered the mask to the heat embossed card base. I have
recently swatched all my Altenew and
Distress Oxides and these are really helpful in choosing the right ink for a
project.
I choose the Distress Oxide Faded Jeans for the background color. Using my Picket Fence Studio Life Changing Brushes, I applied the ink to the background. I then used the Distress Spray bottle to spray water onto the background to create some textures. I did use my heat gun to dry the water. Next, I took the mask out and carefully flipped and adhered it to the other half and repeated all the steps. I then carefully peeled off the masking paper.
At this
time, I noticed that there were some very thin portions at the margins still
white. So, I took a thin brush and applied the distress oxide, this just made
the inking very neat.
Next, I took three colours, which went well with the Faded Jeans distress oxide. I layered and stamped all the small images to create a pattern on the motif.
Once stamped
I again used a brush and Altenew inks to cover up the portions which I had
missed inking while layering.
At this
point, I decided to add more shimmer to my card, but it was a failed attempt as
the grey ink somehow turned all pink, so I did layer and stamp again with the
grey ink. This added ink layer actually made those potions pop.
Next, I
trimmed my panel to a 5” x 5” square, and also prepared a top folding card base
5.5” x 5.5”. I also took another piece
of cardstock 5.25” X 5.25” for matting the stamped panel. To this matting, I
added the Altenew ink to match the inked panel. I then used Art Glitter Glue to
stick all the layers together.
For the
sentiment, I used the Happy Birthday sentiment from Label Love Stamp set. After
stamping and cutting the sentiment strip, I did use my copic marker in black
color and went over all the edges of the sentiment strip. This just makes the
strip pop up and hides the white cardstock.
I did use
foam strips to create dimension and for adhering the sentiment strip to the
card.
Finally, to finish off the card, I used some black sequins.
This is my 10th submission based on the class conducted by Yana Smakula. I am an ardent fan of her work and love whatever she does, so taking her class was a bonus. I have kept this card very basic and simple.
I have used Altenew Build-a-flower Morning Glory stamp set;
Cube cover die and Label Love Stamp set for the sentiment.
I followed the layering guide for the Morning Glory stamp
set and stamped the two flowers using the Deep Blue Seas mini ink cube set. I
also stamped the leaves and stem using Green Valley mini ink cube set. As the
Build-a-flower set already includes the co-ordinating dies, after all the
stamping I used the same to cut all the images.
I did alter the stamped leaves a bit by sticking the individual
leaves to the stem, which had two small leaves. I stuck the leaf on top of the calyx
portion of the stem. This made sets of three leaves on a stem.
I also stamped and cut the sentiment using Versafine Onyx
Black ink and the Label Love stamp set.
To create some interest to the background of my flower arrangement,
I used the Cube Cover die to create the background.
I took an A2 size Neenah
Solar white cardstock 110 lbs for the card base. Firstly, I adhered the Cube
Cover die-cut to the card base. Then, I arranged the flowers and leaves, and
finally used foam dots to mount the sentiment to the card.
My 9th submission for Altenew Educator Certification Program. This card is based on an inking technique taught by Sara Naumann. I used the Altenew mini ink cube directly on the card base to add colour and texture.
For this card, I have used the Altenew Build-a-flower Aster
Stamp set along with Halftone Thanks stamp and die set for the sentiment.
First, I took an A2 size Neenah Solar white 110lbs cardstock.
On this I applied Altenew Frosty Pink ink from the Red Cosmos Collection. While
applying ink on the base, I was twisting my wrist too, so that there was an
added circular pattern formed.
Then I stamped two Asters using the stamp set. One just the
outline and the other, I layered using the inks from the Red Cosmos set. On the
outline image, I did use Copic Marker C3 on the shadow areas.
For the sentiment ‘Thanks’ I layered six die-cuts. The top
layer I coloured using Copic Marker C5 and then used Aqua Shimmer Pen for the
shimmer and shine.
Once the elements were ready. I then stamped a check pattern
using a stamp from my stash, at the bottom part of the card base. After this I
stamped and heat embossed the sentiment “for all you do” on a vellum strip.
For the final bit, I just assembled all the elements and
sentiment on the card base using foam tape and adhered some sequins from my
stash too.